 The Perfect Almond Vanilla Rollout Cookies
Yield approximately 25-30 medium sized cookies
Ingredients:
- 2 c. butter (at room temp)
- 2 c. sugar
- 2 large eggs
- 1 tsp. salt
- 2 tsp vanilla
- 1/4 tsp almond emulsion or 1/2 tsp. almond extract
- 5 3/4 c. all purpose flour
Instructions:- With an electric mixer, cream butter and sugar for 7 minutes on medium speed with the paddle attachment. Beat in eggs just until combined.
- Add salt, vanilla and almond emulsion mixing for about 10 seconds on low.
- Add in flour and mix until dough is pulling clean from the sides of the bowl. In humid weather add up to 1/4 cup more flour if needed.
- Wrap dough in plastic wrap and refrigerate for at least thirty minutes.
- Remove dough from the fridge and preheat oven to 325 degrees.
- To roll out, put dough on top of parchment paper in between two 1/4" wooden dowels. Then roll out with a roller and cut desired shapes.
- Put shapes onto a greased cookie sheet and put in freezer for 10 minutes before baking to prevent spreading.
- Bake for 10-13 minutes. Let the cookies cool on a cooling rack.
- Decorate! You can find my royal icing recipe here.

Showing posts with label tutorials. Show all posts
Showing posts with label tutorials. Show all posts
Tuesday, January 14, 2014
The Perfect Almond Vanilla Rollout Cookies
This recipe is one that I've created over the last few years while decorating cookies, and is now the only vanilla sugar cookie recipe I use. I love this cookie dough because it holds it's shape well and tastes SO good. Enjoy!!
Sunday, December 1, 2013
Christmas Lambs and Candy Cane Cookies {easy picture tutorial for lamb with a flower cutter!}
So dang happy Christmas is just around the corner! Our house is nuts right now with my husband in the middle of his law finals, and me in the middle of my undergrad finals (with lots of cookie orders on top of that). Of course, it's always crazy at the Bowen house what with the 3 year old and 20 month old little boys tearing around.
I hope to do at least one more tutorial for Christmas, but for now here is a very simple lamb cookie using a flower cutter. You could even do this in buttercream and add little eyes or a bow to the lamb.


What you'll need:
- thick black icing
- thick white icing in a bag with a #2 tip
- flower cookie cutter
First fill in a little black head and ears right in the middle of your cookie. I didn't wait for mine to dry, but you can if you'd like. To start on the 'wool', just add small dots close together until eventually the entire cookie is filled in. Add more dots in any areas where the cookie is showing and voila! You've got your very simple lamb cookies (which go great with some very simple candy canes).

I love getting emails with questions and pictures of cookies you've made inspired by things on my blog! I love seeing others work and hearing their stories, so thank you to all of you who have sent me emails and left comments. As for tutorial requests, I will really try to get around to all of them as quickly as possible :) Just be patient with me!
Happy cookie-ing!!
xoxoxo,
Caitlin
Friday, November 15, 2013
What Does the Fox Say?! {fox cookies using a butterfly cutter}
I'm sure everyone has heard the funny/slightly annoying song 'What does the fox say'.. my two year old LOVES it and asks for it every time we get in the car! He is constantly singing it and dancing around the house. I confess, I like it too. So I had to make some fox cookies.
To make these you will need:
* a butterfly cookie cutter
* orange 20-second icing (check out this tutorial here)
* black 20-second icing
* white 20-second icing
* ivory 20-second icing
* fine tipped paintbrush


Once you've cut the bottom of the butterfly off with the top of the butterfly cutter, press the little jagged edge at the bottom until it's smooth

Using your 20-second orange icing, make the outline to the face. Wait for 15 minutes, then fill in the ears and rest of the fox's face.
Add a black nose and eyes once the cookie is dry (give it at least 6 hours). I used brush embroidery around the face. Out of pure laziness I didn't make a thicker icing to do the brush embroidery and it would've been much cuter if I would have! Oh well, lesson learned :).
The last step is to pain on little black eyelashes and you are done!


There you have it! Happy fall ya'll.
Wednesday, October 30, 2013
Royal Icing 'MONSTER-osities' {how NOT to decorate cookies}
Decorating cookies is time consuming. I always carefully draw and design my cookie ideas onto paper before actually making them. I have pages and pages of ideas drawn up just waiting to be made. Of course I have WAY too many ideas to ever make all of them into cookies, so you can imagine that when I do choose to make some, I pick my favorite designs.
One of the best parts of cookie decorating is being able to see your finished product at the end.
Especially when they turn out just as you had imagined in your head.
And then, there are always days like this....... 'Monster-osities'. The cookies only a mother could (pretend to) be proud of.
Oh the horror. This is a good example of two mistakes that are easily made.

1. Not washing out your bowl before making royal icing. If you look at the purple and green, they have a funky grainy texture to them. (I decorated my voodoo doll cookies with the same icing, it's even more noticeable with them!) THAT is what happens when oil gets into your icing. Sometimes you may look at your bowl and think 'that looks clean enough to me'.
I'm warning you, DON'T fall into that trap like I did. These are the results of that exact thinking. And of course laziness. Because who wants to wash a clean mixing bowl?
You may not be able to tell from the pictures, but even after sitting out for 3 days these cookies never completely dried.

2. Adding too much food coloring. Do you see the black? Horrible, I know. Color (especially dark colors like black or red) take time to develop. The best tip for making dark colors is to make a lighter color (like deep gray) and let it sit in the fridge for a couple days. THEN add more black if you need it. But usually after a day or two it becomes much darker
Don't try to make black in one afternoon. Trust me, it doesn't work if you want a true, deep black.
After taking these pictures I waited a few more days and the black still never dried.

It's always so sad when such tender loving care goes into making your cookies and then they come out like this! Hopefully this post will spare some of you from the same mistakes.

And thank goodness it was my 2 year old who ate them and not a neighbor or client :) Especially because the first time he saw himself in the mirror he started laughing and then said "Look mommy! Arrrrrrgh, I'm a pirate!"

Happy Halloween everyone! Hopefully your cookies won't turn out quite as scary as mine did.
Wednesday, October 23, 2013
Royal Icing {how to}
Royal Icing Tutorial. Everything you need to know to get started!
When I started decorating cookies as a hobby I tried probably 20 different Royal Icing recipes. Some used Merengue, some didn't, and some even used egg whites. They were all very similar so I basically just came up with my own through trial and error. You may try it and find you don't love it and make your own adjustments!
SO HERE WE GO! ROYAL ICING MY WAY
(if you're not making a large batch of cookies you can cut this in half or even into fourths!)
Royal Icing
2 lbs {1 bag} confectioner's sugar
6 Tbsp Meringue powder
1/2 c. plus 2 Tbsp warm water
1 tsp. imitation vanilla (or any other non-oil flavoring!)

As the merengue powder goes, I just use wilton. I hear more expensive brands are better, but with my husband in law school and me in undergrad I like to stick with the less expensive option for now! So far it's worked perfectly. :)
Before you start ALWAYS.. like, ALWAYS, ALWAYS, ALWAYS (get the picture?) wash your mixing bowl and paddle/whisk attachment. If any oil at all gets into your icing, it will not set up or dry properly and you will be kicking yourself for not taking the extra five minutes!
Once the mixing bowl and attachment are washed, I whisk together the confectioners sugar and merengue powder. To that I add my warm water and flavoring. I usually add just a teaspoon or two more of the warm water, especially if it isn't humid outside. But be careful! Once you add the water you can't take it out, and the worst thing next to getting oil in your RI is getting it too runny.
Some people choose not to flavor their royal icing, I think it makes all the difference though! My favorite combinations are vanilla and lemon, vanilla and orange, or vanilla and lime. Again, MAKE SURE the extract you buy is oil free! I've found 'imitation' flavorings are usually oil free.
SOOO.. once the liquids have been added, I mix on medium high for 7-10 minutes. It should look fluffy and form stiff peaks like meringue. If you're a first timer, at this point you may think your icing is waaay too stiff, but have no fear, you've done it right if it looks like this. See?
So stiff in fact, that your paddle attachment should stand on it's own without moving in the royal icing.


Now take a dish rag and dampen it with water, then place it over the top of your mixing bowl to keep the RI from getting a hard crust on the top.

Here is where it can get a little bit tedious (especially if you're doing a lot of colors), but consistency is everything. When my cookies don't turn out as planned it is because my consistency was not right.
From here I start on mixing colors and getting the consistencies right. Take desired amount of icing from your mixing bowl and put it into another (CLEAN, OIL FREE) bowl. Add coloring. Then add one teaspoon at a time add warm water into your icing. Stir until it reaches 'line' consistency. It should look about the same as toothpaste. Line icing should hold its shape nicely, but still be smooth enough to squeeze out of an icing bag without killing your hand.


Now it's ready to bag (don't use it all, you'll want some of the same color for 'flood' icing). I like disposable decorating bags , a #2 or #1 tip and use twisty ties on the ends.

Now for the flooding consistency! I use the rest of the icing and slowly add more water until it is about the consistency of shampoo. A good rule of thumb is to lift your spatula and let the icing run off, the icing swirls should disappear within about 10 seconds. Once I have the right consistency I put my icing into decorating bags. This is where I am weird. I know most cookie decorators use squeeze bottles.. I tried em' and I don't like them! That's just personal preference. My flood icing goes into decorating bags without a tip and I cut the end just the tiniest big when I'm ready to decorate.


So the tips don't get clogged, I get another damp kitchen towel and fold it in half. Put the tip of your bag in the fold like this.

Just follow these steps until you've done all of the colors you plan to use for your cookies. You can store icing at room temperature or in the fridge. Good luck!
Friday, October 4, 2013
Pumpkin Decorated Cookies {Easy Picture Tutorial}
Fall is in the air and I am LOVING it!! The leaves are starting to change here in DC and it is easily my favorite time of year. Plus fall means cookies.. so that's good.
Because I promised to do a tutorial but haven't gotten around to it, I did a easy picture tutorial for you guys. This was an order for a Gender reveal party announcing the gender of their little 'pumpkin' (such a cute idea)! Her colors were gray, yellow and blue.


Thanks for the order, Nicole! Congrats on baby boy :)
Wednesday, February 8, 2012
Design Your Own Cookies Tutorial
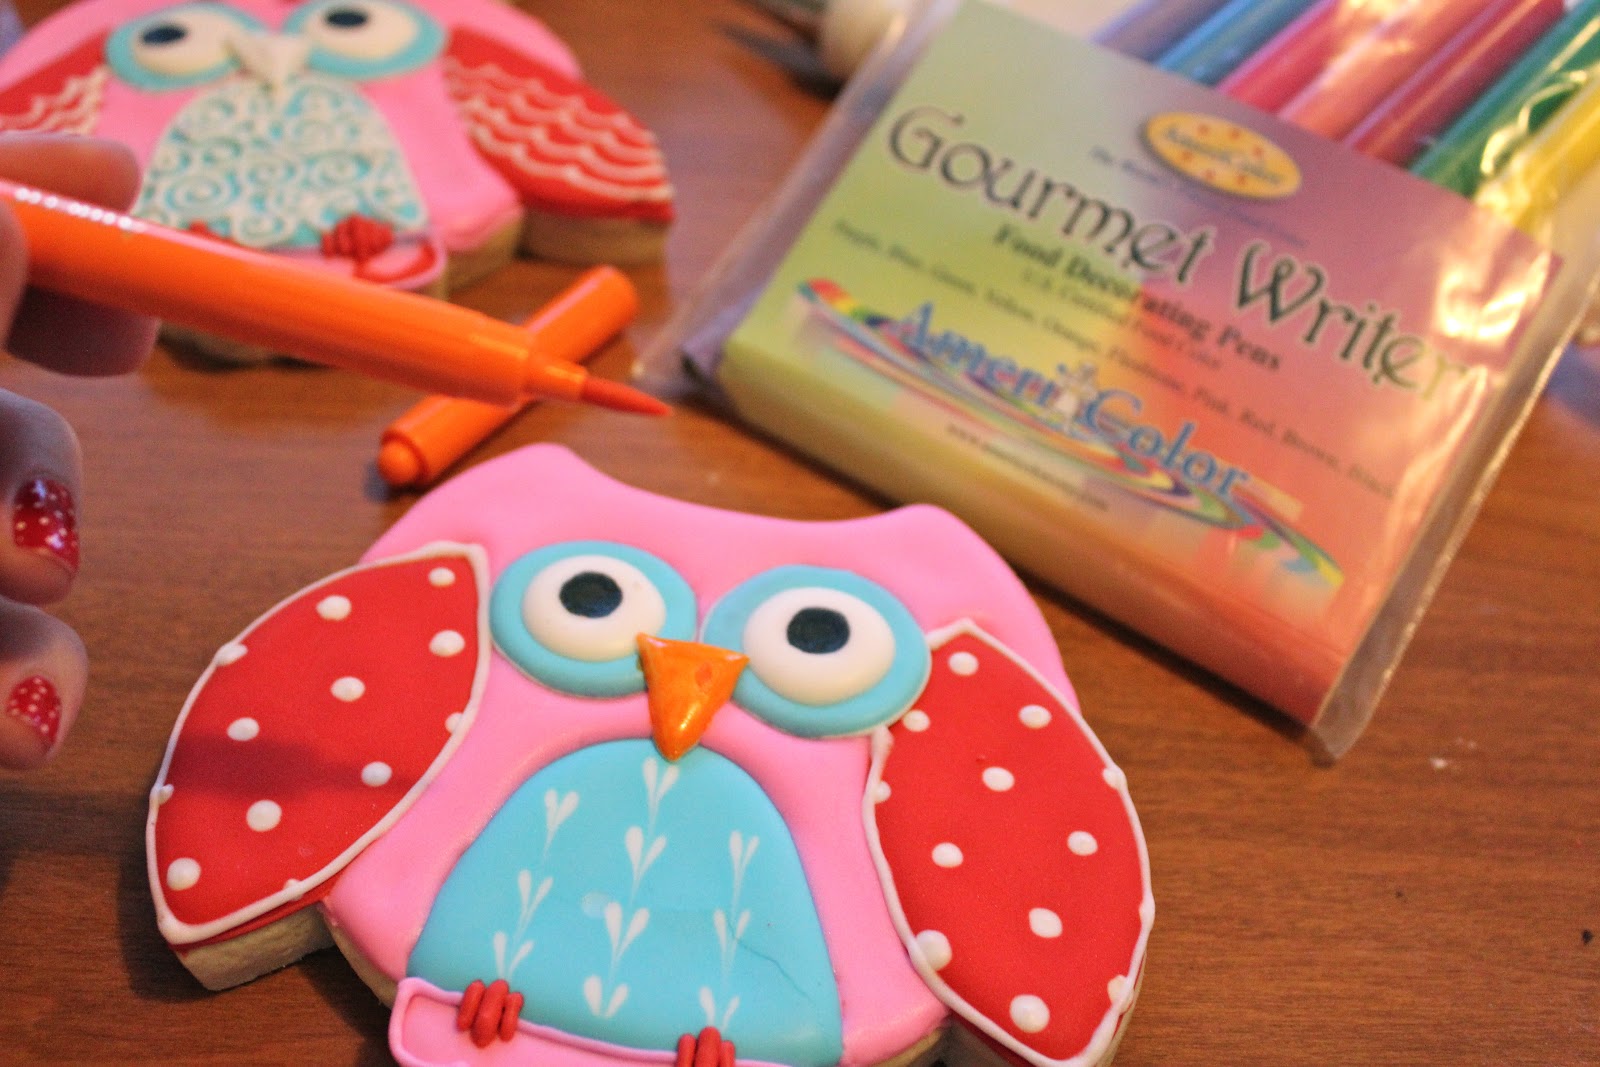
For these cookies, I wanted to do owls but don't have an owl cookie cutter. So I made my own!
To make the owl, you'll need:
2 circle cutters (one smaller)
a Lemon cutter
a double heart mini cutter
Start with the large circle and put it on your cookie sheet. Then, using the lemon cutters, cut out your owls wings. After that use the smaller sized circle to take some dough off the top to make little ears.

Then flip the mini double-heart cutter upside down to make the tail.

After you've baked your cookies, line..

.. and flood. (I let the wings and center dry over night before doing the rest)

After the whole cookie is dry, pipe on a nose, and big owl eyes!

For the nose and eyes I used food color markers (a little secret, then you don't have to make two more colors of royal icing!).
I love sparkly things.. so I always tend to dust my cookies with super pearl to make them sparkle!


And there you have it! Happy Baking :)
xoxo Sugar Bea
Friday, February 3, 2012
Jar of Hearts Tutorial
These perfect little bite size cookies are so simple to make. Really, so easy! And sometimes, smaller is just better.. so you don't feel guilty for eating 28 in one sitting.
Fist make your Royal Icing and mix the different colors you want. Then line away! I used a #1 tip to line these because of their size (on bigger cookies, I often use a #2 tip).


Once all the cookies are lined, go ahead and flood. Use a toothpick to pop any bubbles and to drag the icing to edge of the cookie.

While the cookies are still wet, add any designs you want! I did polka dots, XOXO, hearts and dipped some of them in white sanding sugar.. really the possibilities are endless!
After you've decorated all your cookies, let them dry for about 10 hours.

And you've got yourself some perfect little Valentine's Day cookies!


I gave mine as gifts and put them in a jar with white tulle tied around it. So cute (and yummy)!

Another Valentine post coming soon! If you have any questions on technique you are welcome to email me! If you'd like a tutorial on a certain method, just let me know and I'll see what I can do!
{Happy Baking}
Subscribe to:
Posts (Atom)